Monday, June 29, 2009

Product Review: Twink Beauty

I'm hoping that by reviewing products I'll introduce you guys to products you wouldn't normally try.

So I recently ordered from Twink Beauty on Etsy. The customer service was fantastic and the products arrived within a fortnight, from the US, which is great!

I ordered a sample of feather dust finishing powder, and a lip stain. Very generously they threw in three eyeshadow samples.

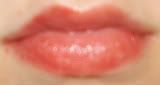
The lip stain was Vamp, and is a gorgeous red colour. I snapped a pic for you guys. The stain does not give the same effect as a lipstick would, no layer over the lips. It doesn't really feel like you're wearing anything and is not a super intense colour, but is really beautiful and probably won't end up rubbing off on everything your lips touch! I'm afraid this picture is not dreadfully accurate, it's not uneven but I just snapped a really crap picture and my battery died before I could get a better one. Sorry! It's a really nice colour and goes on well with fingers or a lip brush.

Photobucket

The finishing powder is beautiful, it gives a really smooth finish to the skin and is nice and translucent, so it doesn't end up just putting more colour over your foundation, but it seals it all nicely. It's a great finish and I'm really pleased, I'll have to order a proper pot of it once my current powder runs out.

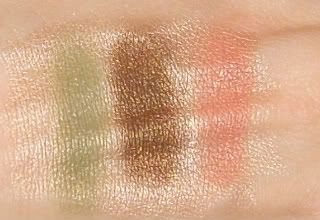
The eyeshadows are really the best thing though, in my opinion. They are beautiful beautiful colours. I got Seagrass, Cocoa and Coral. They all have a beautiful subtle shimmer to them, each with a goldish glitter. It's really pretty and the colours are really super pigmented, you only need a tiny amount. I swatched them on the back of my hand, over my Mac Beige-ing shadestick, to let you guys get an idea of them. I wish the shimmer showed up in the pics

Photobucket

So, ratings....

Customer service: 10/10!
Eyeshadows: 10/10, they deliver exactly what you expect.
Lip Stain: 7/10, I wish the stain was a little deeper, but it feels conditioning on the lips.
Finishing Powder: 9/10, it seems great but I want to use it a little more to get more of a feel for it.


Sunday, June 28, 2009

Product Review: Avon Kajal Sticks

I recently treated myself to some new eyeliners. They were on sale, so I figured "eh, why not?" and got the Avon Kajal Stick in Black, Silver and Purple.

I've used them twice now. I love the silver, so so much. It goes on really smoothly, doesn't drag, and really highlights beautifully. I've been using it on my waterline and it really opens the eye up. Highly highly recommended.

The black doesn't go on QUITE as smoothly, but it's not bad at all. These are pretty soft feeling, moreso than other eyeliners I've used, which isn't necessarily a bad thing. The black looks really nice on the lower lash line if you then blend it out with a brush to make it smoky.

As for the purple, I'm not quite so impressed. I've not tried it on my waterline, but it didn't go onto my upper lid smoothly at all. Like, it basically seemed to hate me. It dragged and the colour wasn't even no matter how much blending I did. So that sucks, because I was hoping it would be awesome.

A good plus for these is they are ridiculously long so they're bound to last a long time, and are well worth actually getting an eye pencil sharpener for. I'm surely not the only person who just throws away a liner pencil when it gets too blunt to use. This might be evidence of how cheap and crappy my previous liner pencils were, haha!

I was going to rate these altogether, but I'll rate them by colour.

Silver: 10/10
Black: 8/10
Purple: 4/10

I hope this was helpful to some of you. :)

Friday, June 26, 2009

Cleaning makeup brushes

What good is a makeup brush in bad condition? We don't want our brushes to get sticky or start losing hairs or their shape! We also don't want them to be a home for bacteria that could cause eye or skin infections. Yuck!

Cleaning your brushes is important for your skin and helps your brushes last longer. People have different methods of cleaning and organizing my brushes. Here's my method:

1) I get the bristles wet, then use a little bit of shampoo on the bristles and gently work the lather in.

2) Rinse the bristles.

3) Lay brushes to dry on a towel.

4) Put brushes back in case.

Don't wet the metal barrel on the brush, or store brushes upright while wet, because bristles may start to shed. Let them air dry completely as they lay on the towel before storing them in your brush case or upright in a cup.

Thursday, June 25, 2009

"Skin of color"

Ok, ok, everyone has some sort of color and multiple colors, but today I will be informing you about darker skin. Now, my skin isn't all that dark (although I've been told otherwise), but it is a light olive tone, with yellow undertones, and tans easily.

It is very frustrating for women to find the right shade of foundation! It is harder for us "women of color"! We have such a variety of tones, shades, and skin types.

For foundation, I like to compare the foundation's color to my skin color in a mirror. If the shade disappears and blends in perfectly, it is the right shade.

I have come to discover though, that I need two shades of foundation. One shade for when I have not tanned, and another one for when I have tanned.

We also have to deal with other skin issues such as hyperpigmentation and dark scars. I have both issues to deal with.

If you have a skin picking problem, quit already! I tend to pick at my skin, and my skin always reacts by making dark scars that take a while to go away!

I also deal with hyperpigmentation, which makes skin of color look uneven or patchy. Protect your skin from the sun to prevent it!

Yes, we tend to tan and not burn because we have more melanin, but the sun's rays can still burn skin of any color in the right condition, and it just isn't a good idea to be exposed to UV rays without protection. Skin cancer occurs in every race, so protect your skin!

Wednesday, June 17, 2009

Want long, luxurious locks?

Unlike certain hair styles and cuts, growing long hair is usually a very simple process that most people over-complicate. Does growing lovely locks take 30 dollar shampoos, 4 fancy conditioners, and 10 different herbs? Not at all. So what? Just let it grow? Yes, it is basically just letting it grow. There are some pieces of advice though that you could take to grow long hair if you're aiming for healthy hair too.

Nice long hair does not usually depend on hair products, meaning that you don't need a fat wallet to start on this journey. Handling is the key. Here are some handling tips:

1) Snip split ends

Not all people can do this without getting frustrated or really straining their eyes though, and they can be successful in growing long hair without this tip. Some people find it really easy. I find it enjoyable. When I remember, I sit down, look at my hair under a good light, and remove offending split ends. Split ends are usually a lighter color than your hair, and are usually split like a Y, or look like white dots.

2) Avoid rubbing

If you let your hair down, and are sitting down on a chair, make sure that your hair doesn't rub between your back and the seat. This can cause breakage and tangling. In these situations, I put my hair over my shoulder, or I put my hair in an updo. Consider using a satin pillowcase when you sleep, since cotton pillowcases make hair tangle more.

3) Gently towel dry

Your hair is not any old mop! Don't treat it like one! Squeeze water gently out of your hair after washing, and don't rub the towel vigorously on your head. This causes more tangles.

4) Wash gently

First, don't pile your long hair on your head and start rubbing the shampoo in. Again, this creates tangling, especially on freshly shampooed hair! Another good idea, is to just shampoo your scalp, rinse, and just let the suds from your scalp travel down to the length instead of directly applying shampoo to your length. This way, your length and ends don't get over-shampooed.

5) Comb gently

Don't rip that comb through your hair! We want to avoid broken hairs! When you comb, start from bottom to top. Grab a piece of hair, or put your length over your shoulder. With one hand, grab the section of the hair, and hold it near the bottom. With the other hand, comb out the tangles. Then grab the section of the hair again, but this time, move your hand up a little, and comb with the other hand. Keep going up with the holding hand and the combing hand. Don't just comb from the top of your scalp down, since you might rip through tangles.

6) Give your hair a rest

This means "Don't go overboard with products". Products usually build up, and build-up causes hair to lose its shine. There usually isn't a miracle product or treatment, and trying so many at a time leads to confusion and disappointment. Take it slowly. Hair grows at a certain rate, so you're better off ignoring it than throwing a million products at it.

Tuesday, June 16, 2009

Dealing With Beauty Emergencies

Beauty emergency? Gotta deal with it quick? Here's some tips.

Greasy hair:

Someone's coming over and your hair is dripping with grease! No time to wash your hair either. If you have light hair, put baby powder on the greasy parts of your head, then brush out. I have dark hair and I've barely gotten away with this. I just had to brush even more!

Other time, I just touch my hair up by putting gel on it. Your hair isn't greasy! It is gel! I pull it back or put it up too.

A pimple:

Tea tree oil the night before. Gently squeeze the offending pimple if it has a head. Conceal. I just use more foundation in that area. Don't cake it up too much though! Don't mess around with the pimple too much. It might get bigger. Some people swear by crushing aspirin, making a paste with water, and putting the mixture on a pimple. Relax, your life hasn't ended, and pimples are common anyways. You won't be a freak.

Remember to use face lotion before putting on foundation, or your skin will look too flaky, and your makeup will look too powdery and fake.

Frizz:

When I have frizz issues, I use either a bit of olive oil (or you'll have to take care of greasy hair), conditioner, or aloe vera gel. Aloe vera gel is also great as a hair gel. Water alone actually does pretty well on my hair.

Split ends:

Just snip your split ends, or go for a tiny trim.

Nail polish issues:

Just did your nails, got distracted, and now you have fingerprints or other marks? If there are no chips or spaces without polish, just use clear polish over your nail. Now it will look fresh and the prints are gone!

Greasy face:
Sometimes my face is unbearably greasy. I just run to the Ladies' room and pat the shiny areas. Put powder on afterwards.

Stray facial hairs:

Seriously, if you have stray facial hair, and it drives you crazy, you need tweezers. Multiple tweezers. At home, at school, in your car, etc. oh, and same with nail files for nail emergencies.

Impromptu picture:

Besides cursing under your breath, you can comb your hair a little, dab on a bit of foundation, maybe a bit of lipstick quickly to give your face color, and voila!

Or do your best pose, and smile!

Building a good make-up kit: Getting Started

So, this is one thing that is actually quite difficult. A lot of people come to make-up with just no idea what to buy first. There are so many options out there it's easy to get overwhelmed! So I'm going to give you a post here telling you what I think are the essential items that will get you started on your make-up journey.

1) Good make-up brushes.

These DO NOT have to cost the earth. Mine were about £20, are goat hair, and are just wonderful. Really nice quality, work perfectly for all I need them for. Here's a picture of mine for you. Note, it does not get progressively smaller... I just photographed it from a rubbish angle!

You can tell which ones I don't use, because they're still wrapped in plastic.


This set is perfect for me, it didn't cost the earth and is great quality. The brand is XinYiZhui and you can sometimes find their stuff on eBay. I actually helped Havana find a similar set, cept hers is gold and has a huuuuge bronzing brush that mine doesn't have. You can look around on eBay and generally find a great deal on brushes, but PLEASE shop around. MAC brushes are extortionate and I will not pay the amount they charge for them. Maybe their brushes are OMG AWESOME but mine work great, so I'm not phased.

2) A decent eyeshadow pallette.

This is something that is super easy to get for a very good price. I have the fantastic 120 palette from eBay that you'll find lots of people on YouTube using. The seller I bought mine from is Jolieeeee, but there are plenty of sellers selling the exact same products. These are very highly pigmented and a fantastic price, you'll never be lost for a colour again. This has just about every colour you could want and is a great way to get started without having to debate which colours you want. You can have them all! :)

Please remember that these are coming from Hong Kong so I cannot vouch for the ingredients and they might not be a great idea of you have sensitive skin. My skin is sensitive and has always been fine with them, but your mileage may vary.

3) A good make-up mirror.

Mine is a cheap one from Ikea and I love it. One side is normal, one magnified, and it only cost a couple of quid!

Find it here. For the price, you really can't complain!

4) Eye primer.

You REALLY do need this if you want the shadow to stick to your eye. I personally use Beige-ing Shadestick by Mac, but you could also use one of their paint pots in the colour of your choice, generally find something close to your skin tone. This WILL help the eye make-up stick. Alternatives are Urban Decay Primer Potion or Too Faced Shadow Insurance. You just have to find out which one will work best FOR YOU.

5) Mascara.

This, again, does not have to cost the earth and will be a matter of personal choice. I use Mac Plushlash, but your milage may vary. Please look at the price... it is NOT that expensive. You'd pay between £5 and £8 for a drugstore mascara anyway... this stuff works better and doesn't clump. It's worth the extra few quid, in my opinion.

6) Eyeliner.

You will have to decide what kind of liner you prefer for this. I can recommend MAC Fluidline (though I have none, boohoo!) as it glides on really smoothly. But a good eye pencil will go a long way and allow you to line under your eye aswell as over it. NEVER use liquid liner under your eyes. Just don't. It'll run all over the place! I use black gel liner from this seller and it's fantastic, almost as good as MAC fluidline I'd say. It's fantastic and so cheap!

7) A versatile lip colour.


This, again, is a matter of personal choice. Obviously, I like MAC products for this. You can decide what you like best... a nude tone, gloss, a nice pink or brown. Choose something you could wear with anything, you want this colour to be versatile so you can get by with just the one lipstick till you can afford more. You could also go for a lip palette like the eyeshadow one. There will be plenty on Ebay, or from the same seller as I linked on the eyeshadow and eyeliner. This is a bargain because for the price of one MAC lipstick you could get 36 colours in a palette. The only downside is it's hard to take it with you to do touch-ups.

8) Blusher.

Once again, get a palette! Contour, highlight and blush is really important, IMO, or you just end up one colour all over from your foundation. NOT what you want. Your face is not naturally all one shade, you don't want to look that way. You want to add in the shadows and highlights to make it look natural. I really recommend the 6 colour contour palette as it allows you to contour, blush and highlight all from one palette. I use mine all the time and love it so much. The same seller also has blush palettes with other blush colours, as you might want more variety.

9) Foundation and powder.
This is a personal choice again, I'm afraid. I personally use Bare Minerals in Fairly Light. Now, the plus of this is I can use the Warmth that comes with it as my contour when I do my blush. Handy, eh? My powder is their Mineral Veil. If you don't know what your skin tone is then please, don't just guess. Go to a department store and ask at one of the make-up stands what they recommend you use. MAC have told me not to use foundation, just to blend concealer with their Strobe Liquid. Unfortunately that's expensive and doesn't cover my acne as well as the Bare Minerals stuff does.

NOTE ON FOUNDATION: A good foundation WILL NOT look like you're wearing make-up. Anyone who has ever commented that I have beautiful skin... THAT is the result I wanted. It is not my skin, it is fantastic make-up that makes me LOOK like I have beautiful skin. If you look like you're wearing foundation... ur doin it rong. You want it to look natural, not "I spent an hour today applying this shit to my face with a trowel."

Aaaaand I think that's about it. I kind of went in my personal order of importance, but you can decide what your priority is. Try not to skip things like primer... they'll make your eyeshadow look better and last longer!

Eyeshadows Vs Pigments:

Now, lots of people are scared of pigments. They come in quite a large pot, lots of product in it and they think "I will never use this up." But... you pay £9 for a MAC eyeshadow and £14 for a pigment... the pigment WILL last longer and be more versatile. You can use it on your eyes, your lips, to highlight and contour, as body shimmer, in your hair, on your nails. The only problem is that they can run all down your face... the way to fix this is to lightly tap off the brush on the edge of the pot, so that you tap off any excess and won't get it all falling down your cheeks. If you're going to use a pigment you absolutely must use a primer to help it adhere to the skin better.

Order of application:

Now, I'm going to tell you a secret. I apply my eye makeup before ANYTHING else. Yep... guess why? Because that way I can spill eyeshadow and pigment ALL over my cheeks and it doesn't matter. I can wipe it away, without fear of removing half of my foundation with it! Then I do my foundation and concealer (Bare Minerals foundation is foundation and concealer in one), contour, blush, highlight and then powder. After that I do my lips. I find this much easier than constantly worrying that I'm going to ruin my foundation with my eyeshadow fall-out.

I've got my essentials, what next?

Well now, it's all up to you! You can decide what your priority is... lip colours, eye colours... you could get some stuff to define your brows, collect more mascaras. Or... just stick with the essentials. It's all up to you!

If anyone has any questions, please feel free to ask. I love helping out and I'm really enjoying working with make-up. It's something I've become pretty passionate about.

Again... please please feel free to ask any questions. Havana and I are happy to help. ^.^

Here's Havana!

Hi everyone! I'm going to follow Cali's lead and post my routines and favorite products.

I have oily skin, but I don't like to overdry it either, so I like to keep things gentle. My hair is waist-length, wavy, and thick. My hair type is 2a/M/iii.

Now what are these hairtypes? The first number refers to curl, the second to strand thickness, and the third to overall thickness. Cali and I use Fia's Hairtyping System.

I use a combination of Lush and other products I have come to love. For my face, I use Lush's Angels on Bare skin or Fresh Farmacy. Then I dab tea tree oil on nasty pimples. I love my Queen Helene Mint Julep Mask, and I also use their cocoa butter lotion on my body. I cannot forget Lush's Dream Cream though, this is great for troubled skin that has problems with shaving rashes! This stuff is a life saver, and I like using it on my face too.

I am a fan of essential oils though. Lavender and Tea tree are my favorite. I also like Eucalyptus. All are great for skin with acne issues.

I also have a simple hair care routine. I switch between Lush's Jumping Juniper shampoo and their Reincarnate shampoo. If I need to condition, I just use some Suave stuff, although I also like Lush's Jungle conditioner, which I need to buy! I'll dab a little olive oil on the ends and length if needed. That's all I do.

My foundation is L'Oreal True Match in neutral (n3). I use the compact.

My top 3 products I couldn't live without:

Well, this is tough.

1)Lush Reincarnate Shampoo

2)Lush Dream Cream

3)Tea Tree Oil

What? No makeup? I love my makeup, but pimply skin and unwashed hair? No thanks.

I don't really have top 3 brands at the moment though!

Top 3 beauty related items:

1) Nail file

2)A wide tooth comb

3) Nail polish

Hi guys, I'm Cali!

So, Havana and I decided we should introduce ourselves, but we wanted to keep things as topical as possible so we're going to talk about our skin and haircare routines and our favourite products!

So, first I should tell you about my skin and hair types. My skin is combination, with incredibly oily areas and ridiculously dry areas. My hair is mid-back length, wavy and thick. For anyone who knows hair types I'm 2c/m/iii.

My skin care routine I try to keep simple, but it keeps getting more and more complicated. All my skin care products are from Lush at the moment. As it is I try to use a face mask once a fortnight, normally Cupcake though I've recently been converted to their Love Lettuce mask which is just awesome. I use Coalface as my cleanser, Tea Tree Water toner, Grease Lightning spot treatment and Enzymion moisturiser. Between them these products control my grease and acne fairly well, without drying my skin out.

My hair care routine is very simple, mostly because I've become very very lazy with it and suddenly my hair is ridiculously co-operative without me needing to beat it into submission! I use Reincarnate shampoo, by Lush, which is so conditioning I rarely need conditioner. When I do I use Lush's Jungle solid conditioner. My colour is by Schwarzkopf, and is I think number 043, Red Passion. But I could be wrong on the number, I have the memory of a goldfish.

My foundation is Bare Escentuals Bare Minerals in Fairly Light.

3 beauty related items I could not live without:
1) My nail file. It's a ruby stone by Trim and I use it pretty much every day to keep my nails in shape.
2) Mascara! My current mascara of choice is Plush Lash from MAC.
3) Bubble bath... we all need a little pampering!

My top 3 products:
1) MAC's Shadestick in Beige-ing. I use it as my primer and it goes on smoothly with a nice subtle sparkle.
2) Sweet Lips Sugar Scrub from Be Never Too Busy To Be Beautiful. This stuff gently scrubs the dead skin off your lips whilst tasting fantastic!
3) Vanilla DeLite body lotion from Lush. This stuff smells totally delicious!

My top 3 brands:
1) MAC.
2) Lush.

Hopefully in our coming posts we'll be able to bring you reviews, tips and tricks, tutorials and beauty advice!

Calico Kellas, signing off. :)